Web3
Bittensor
A brief overview of Bittensor, detailing its key facts, technological innovations, and funding sources.

In a nutshell
In this section, we offer an overview of Bittensor projects, including essential facts about the network’s participants and components. We also detail the process involved in minting the token.
Some facts
| Executive Summary | Mining TAO using your spare Machine Learning equipment. |
| Website | https://bittensor.com/ |
| Whitepaper Publication Date | 2022/04/28 |
| Whitepaper | https://drive.google.com/file/d/1VnsobL6lIAAqcA1_Tbm8AYIQscfJV4KU/view |
| Launch Date | 2021/11/03 |
| Current Chain Status | Bittensor Network |
| Repository | https://github.com/opentensor |
| Token Details | https://coinmarketcap.com/currencies/bittensor/ |
Short summary
Bittensor is an open-source protocol that powers a decentralized machine learning network on the blockchain. It enables machine learning models to train collaboratively, rewarding them with TAO tokens based on the informational value they contribute to the network. This network aims to accelerate the development of artificial intelligence by promoting an optimized training strategy where models engage in an incentivized, iterative ecosystem. This approach not only advances the technology but also supports a more equitable and collaborative model for ownership and access.
The system includes the following key components:
- The Ledger: The Bittensor Decentralized Machine Learning (DML) protocol can be implemented on any ledger that supports the verification of Bittensor’s proofs, such as proof-of-useful-work.
- The Markets: Comprising both training and inference markets, these decentralized marketplaces allow clients and miners to submit their orders into the respective order books.
How to mint tokens?
To mine tokens on Bittensor, you must first secure a UID slot within one of Bittensor’s sub-networks through a competitive registration process. Once registered, miners provide machine learning services by hosting and operating their own machine learning models. When a client application requests a prediction, the Bittensor network routes this request to the appropriately registered miner. The miner then processes the request using its locally hosted model and returns the prediction to the client via the network.
Bittensor encourages interactions among high-value peers within the network, ensuring that the most valuable nodes earn substantially more and are incentivized to maintain their registration. The Bittensor Protocol allocates rewards and network ownership proportionally to the value contributed by each user, fostering a fair and equitable system that rewards innovation and creativity. By maintaining your nodes as high-value peers, you can maximize your earnings.
What role can I play in the system
The participants in the system include:
- Client: Clients use TAO tokens to engage with the Bittensor Network for task solutions.
- Miners: Miners supply machine learning devices and host machine learning models, primarily providing computational intelligence to the Bittensor system. They are also eligible to mine new blocks, earning rewards for block creation and transaction fees from transactions within those blocks. The likelihood of minting a block is proportional to the value they contribute to the network.
In practice, users can assume one of two roles:
- To solve tasks on the Bittensor Network, you must purchase TAO tokens and install the necessary software.
- If you possess underutilized machine learning equipment, you can lease it to the network to earn tokens. The network is designed to be user-friendly and accessible, equipped with a variety of tools and resources to help users get started.
Tech innovations
Every project that aims for long-term success must incorporate technological innovations into its product. In the cryptocurrency domain, these innovations typically stem from mechanisms designed to thwart attacks. It is essential for mature projects to explicitly outline in their protocols the attacks they are vigilant against and the proofs utilized to mitigate these threats.
In Bittensor, robust measures are implemented to protect against two types of attacks that malicious miners could use to claim undue rewards: Disjoint Cabal Attacks and Inflation Attacks.
- Disjoint Cabal Attacks: Malicious miners may manipulate voting to favor themselves by ignoring the pruning score and adjusting weights, thereby artificially inflating their rewards at the network’s expense.
- Inflation Attacks: Malicious miners, though not majority-trusted within the network graph, may manipulate the system to capture the majority of token inflation.
To counteract these threats, Bittensor utilizes Proof-of-Inter-Model-Weights (PoIMW) and Proof-of-Loss-Term (PoLT):
- Proof-of-Inter-Model-Weights (PoIMW): By auditing only the inter-model weights W and not the parameters of each model, this proof safeguards against Disjoint Cabal Attacks.
- Proof-of-Loss-Term (PoLT): Utilizing a loss calculation pegged as L = -R(C – 0.5), which promotes an increase in the number of weights an average miner sets across the network, this proof effectively prevents Inflation Attacks.
Funding
Bittensor is a self-funded project. It does not provide rewards for crowdloan participation, underscoring its independence and lack of reliance on external funding sources for operations.


Web3
Mining Qubic using GPU
This tutorial provides a good starting point for mining Qubic using a graphics card.

Introduction to Qubic
Qubic has recently gained popularity as a PoW coin. However, continuing to mine with a CPU yields dismal daily earnings. Consequently, many miners have transitioned to GPU mining. This tutorial provides a good starting point for mining Qubic using a graphics card.
Overview of Qubic
Qubic is the first L1 blockchain utilizing useful Proof-of-Work (uPoW). Instead of using computing power for verification, uPoW operates through a quote-signature-vote mechanism, rewarding miners based on their contribution efficiency. This allows the network to allocate saved computing power to AI neural network training. The entire Layer1 employs the Quorum protocol, integrating oracles and smart contracts to enable real-time data and user transactions quickly and freely on-chain.
The Qubic project, initially launched on bitcointalk in 2014 but later abandoned, was relaunched in 2022 by the renowned crypto OG Sergey Ivancheglo. Sergey Ivancheglo, also known as Come-From-Beyond (CBF, Medium Account: https://medium.com/@comefrombeyond), is one of the four co-founders of IOTA. Following disagreements with the IOTA Foundation Board, he explored other projects, including Qubic.
Overview of Qubic CPU Mining
Currently, the Qubic network comprises 676 Computor nodes acting as validators. These nodes, equipped with top-tier hardware, are dedicated to running the Qubic protocol for optimal blockchain performance. The typical configuration in recent epochs has been:
| Item | Requirements |
| CPU | At least 8 cores, high-frequency CPU supporting AVX2 |
| RAM | At least 128GB |
| Network | At least 1GB/s |
Running this protocol requires high computer specifications. However, even with such setups, daily earnings became dismal after epoch 99 (week of March 24, 2024), sometimes not mining a single solution in an epoch. Therefore, transitioning from CPU to GPU mining is now common, as GPUs have a hash collision rate exponentially higher than CPUs. While many tutorials cover CPU mining, this guide focuses on setting up GPU mining.
Choosing a Qubic GPU Mining Machine
CPU mining typically has a payback period of about two years due to the lower cost and power consumption of CPUs compared to GPUs. For example, high-end CPUs like the AMD Ryzen 9 cost around $500 with a power consumption of 100W, while top-tier GPUs like the 4090 cost about $1500 and consume around 300W. Despite the higher cost and power consumption, GPUs significantly boost mining hash rates from approximately 20kH/s to 100MH/s—a 500-fold increase. However, GPU mining’s higher power consumption results in a considerably higher electricity cost, reducing the payback period to about half that of CPU mining.
If you already have a GPU, proceed to the next section for machine configuration. For those without a GPU, renting one is necessary. Given Qubic mining’s high network speed requirements, price and network speed are crucial factors when renting a GPU. While AWS, Google Cloud, and Azure offer strong stability, they are relatively expensive and do not provide consumer-grade graphics cards like the 4090 due to agreements with Nvidia. Suitable alternatives include vast.ai, runpod.io, io.net, and loopin.network. Here’s a comparison of these options for the 4090:
| Network | Bandwidth and Stability | Price (USDT/hr) |
| vast.ai | High | 0.4 |
| runpod.io | High | 0.54 |
| io.net | Average | 0.37 |
| loopin.network | High | 0.17 |
Choose your machine from these GPU providers according to your preferences. I personally used loopin.network’s machine, which met my expectations. Detailed instructions for purchasing a loopin.network machine can be found on their website ([https://docs.loopin.network/zh/tutorials/LLM/llama3](https://docs.loopin.network/zh/tutorials/LLM/llama3)).
Setting Up a Qubic GPU Mining Machine
After purchasing a machine, the GPU provider usually supplies a Docker container. Log in to your loopin.network account, go to the Wallet option, and access your remote server under the **Rented Servers** section via Jupyter Notebook. Typically, it takes 2-4 minutes to start the instance. Once you have the instance, use nvidia-smi to verify if the machine meets your expectations. I purchased an RTX 4090 machine, and the terminal showed the following:
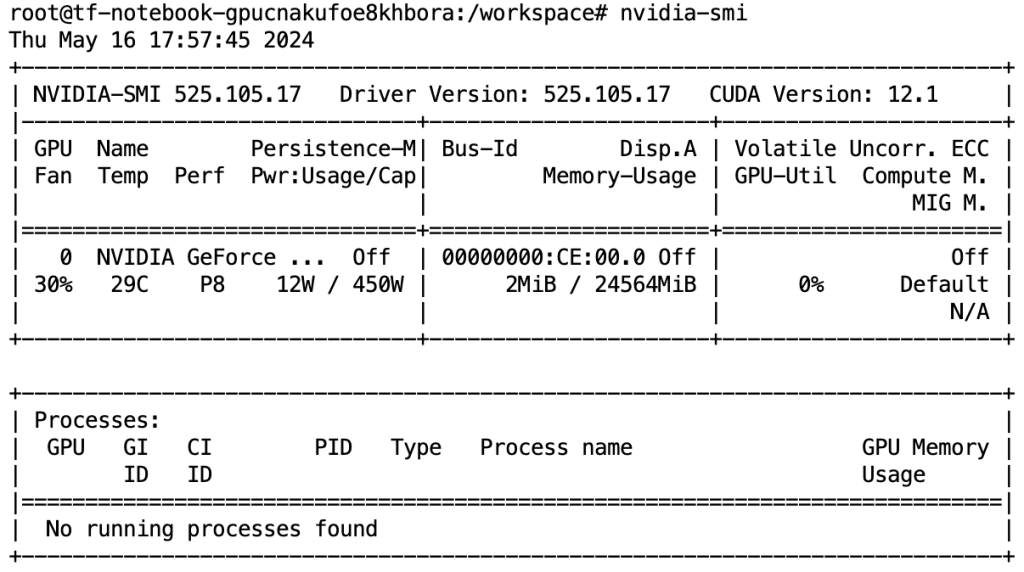
You can see that this machine is an RTX 4090 with a power consumption of 450W. The GPU is clean, with 0% usage. The CUDA version and GPU drivers are up-to-date. This setup saves a lot of trouble compared to manually configuring the operating system and drivers.
Installing Mining Software
- To keep our directory clean and organized, create a new directory qli/: mkdir qli. After we create the folder, we use the
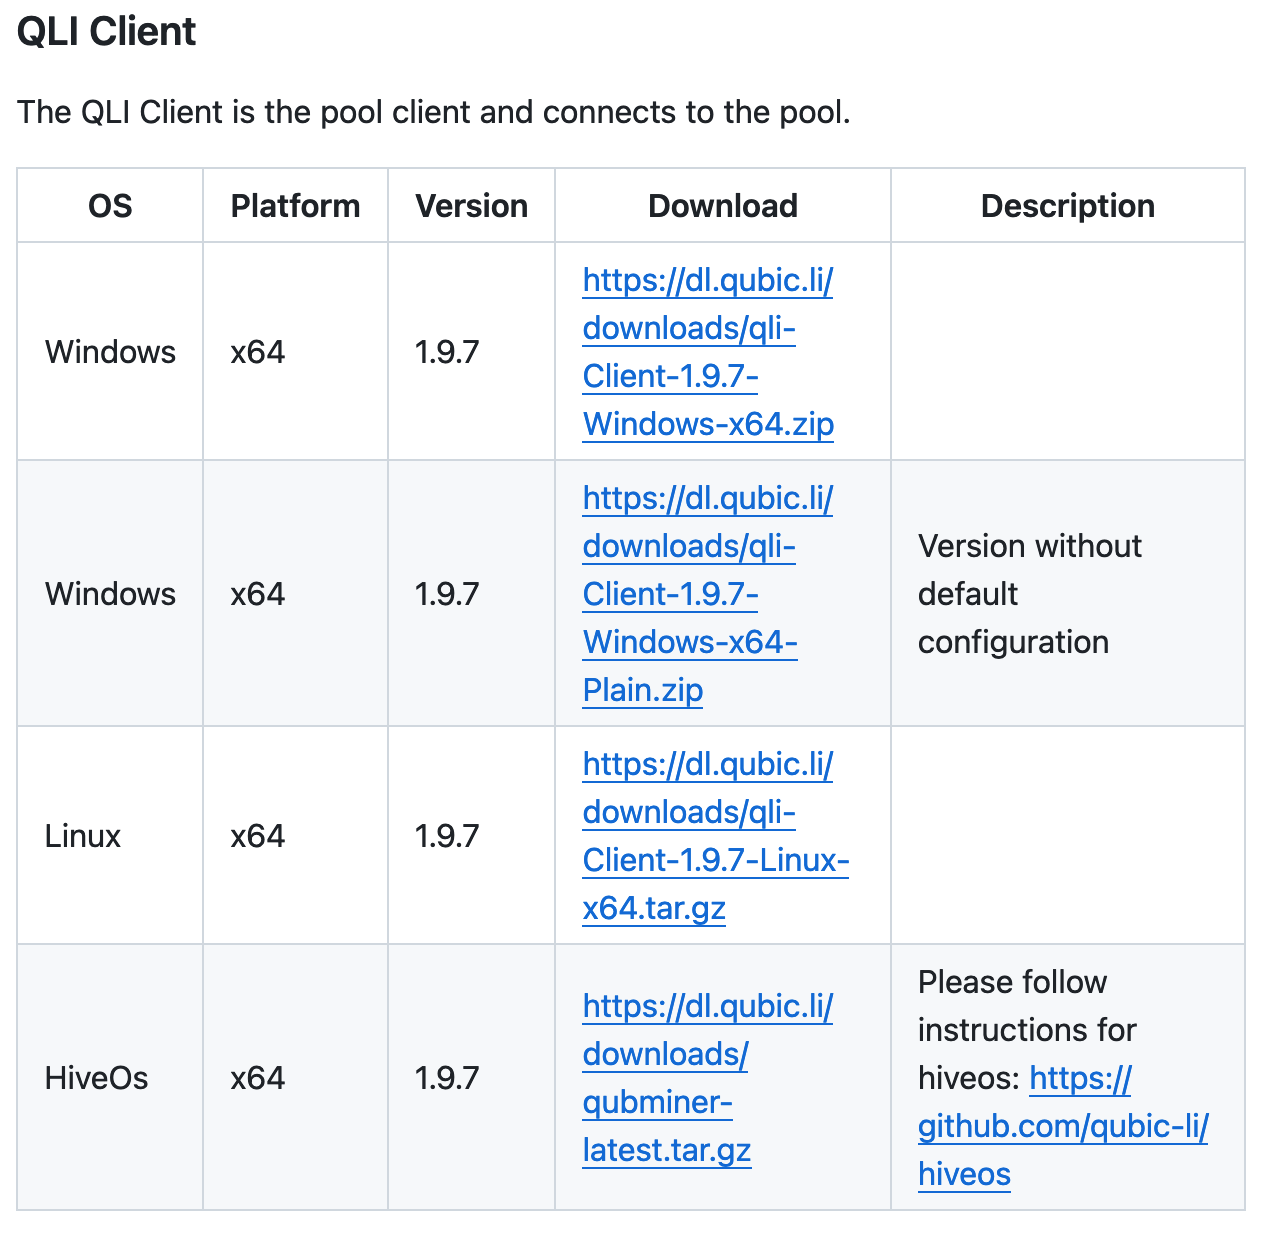
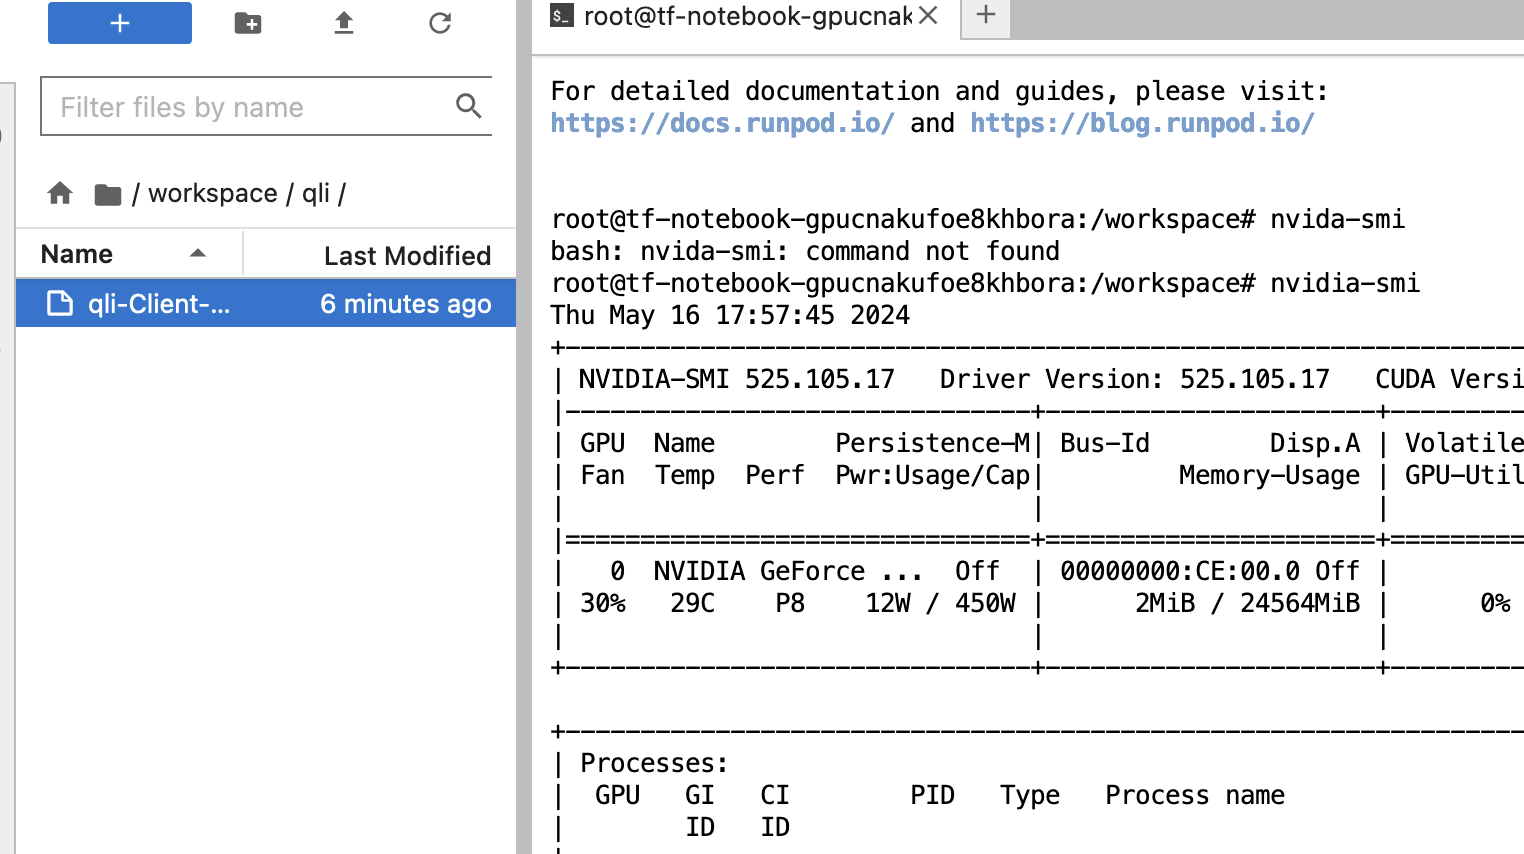
lscommand to confirm the creation of the new folder qli in the root directory. - Obtain the mining software. The mining software directory is available at https://github.com/qubic-li/client. For Ubuntu systems, choose Linux x64, the third option. Enter the qli folder using: cd qli, and then we download the mining software with wget: wget https://dl.qubic.li/downloads/qli-Client-1.9.7-Linux-x64.tar.gz. If the machine is in China and download speeds are slow, use Jupyter Notebook’s upload function to upload it to the specified folder.
- Extract the software. Use the tar extraction command with the appropriate settings: tar -xvf qli-Client-1.9.7-Linux-x64.tar.gz. After extraction, confirm the software files using the
ll -athcommand. The appsettings.json file is the mining configuration file, and qli-Service.sh is the script file. Both are text files that can be opened with an editor. However, the qli-Client file is a compiled binary that cannot be opened with an editor.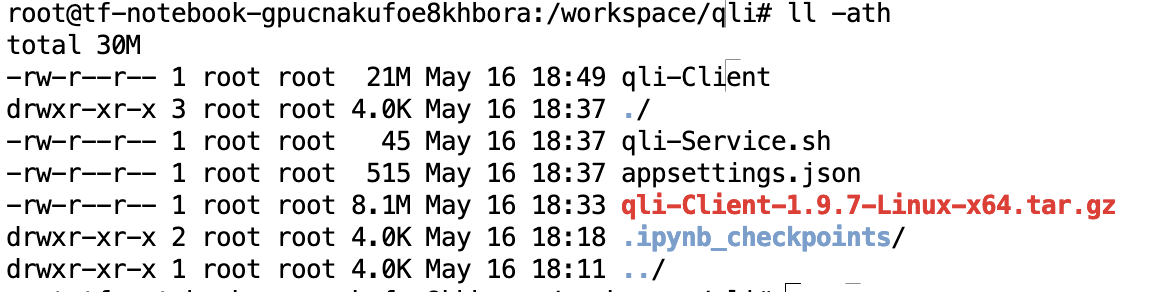
- Install a text editor. Setting up the mining software and running scripts requires
viorvim. Generally, our GPU does not have this command installed, so install thevi/vimeditor first. Update the cache usingapt update, then install vim withapt install vim. The installation process will prompt for confirmation; select Y and press enter to start the installation.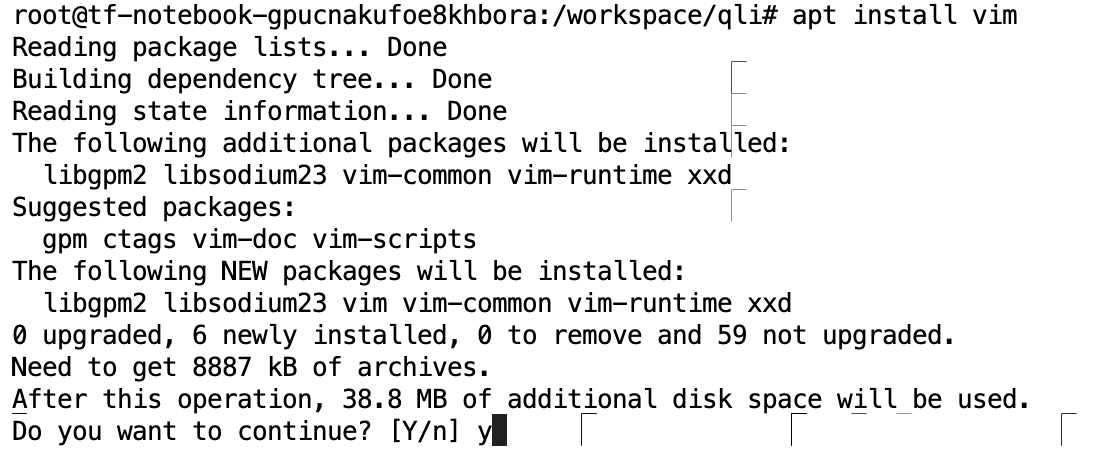
- Edit the mining software configuration file appsetting.json. Use
vi appsettings.jsonto open it for editing. Fill in your address for payoutId and the token received during Qubic registration for accessToken. - View the qli-Service.sh file. Use
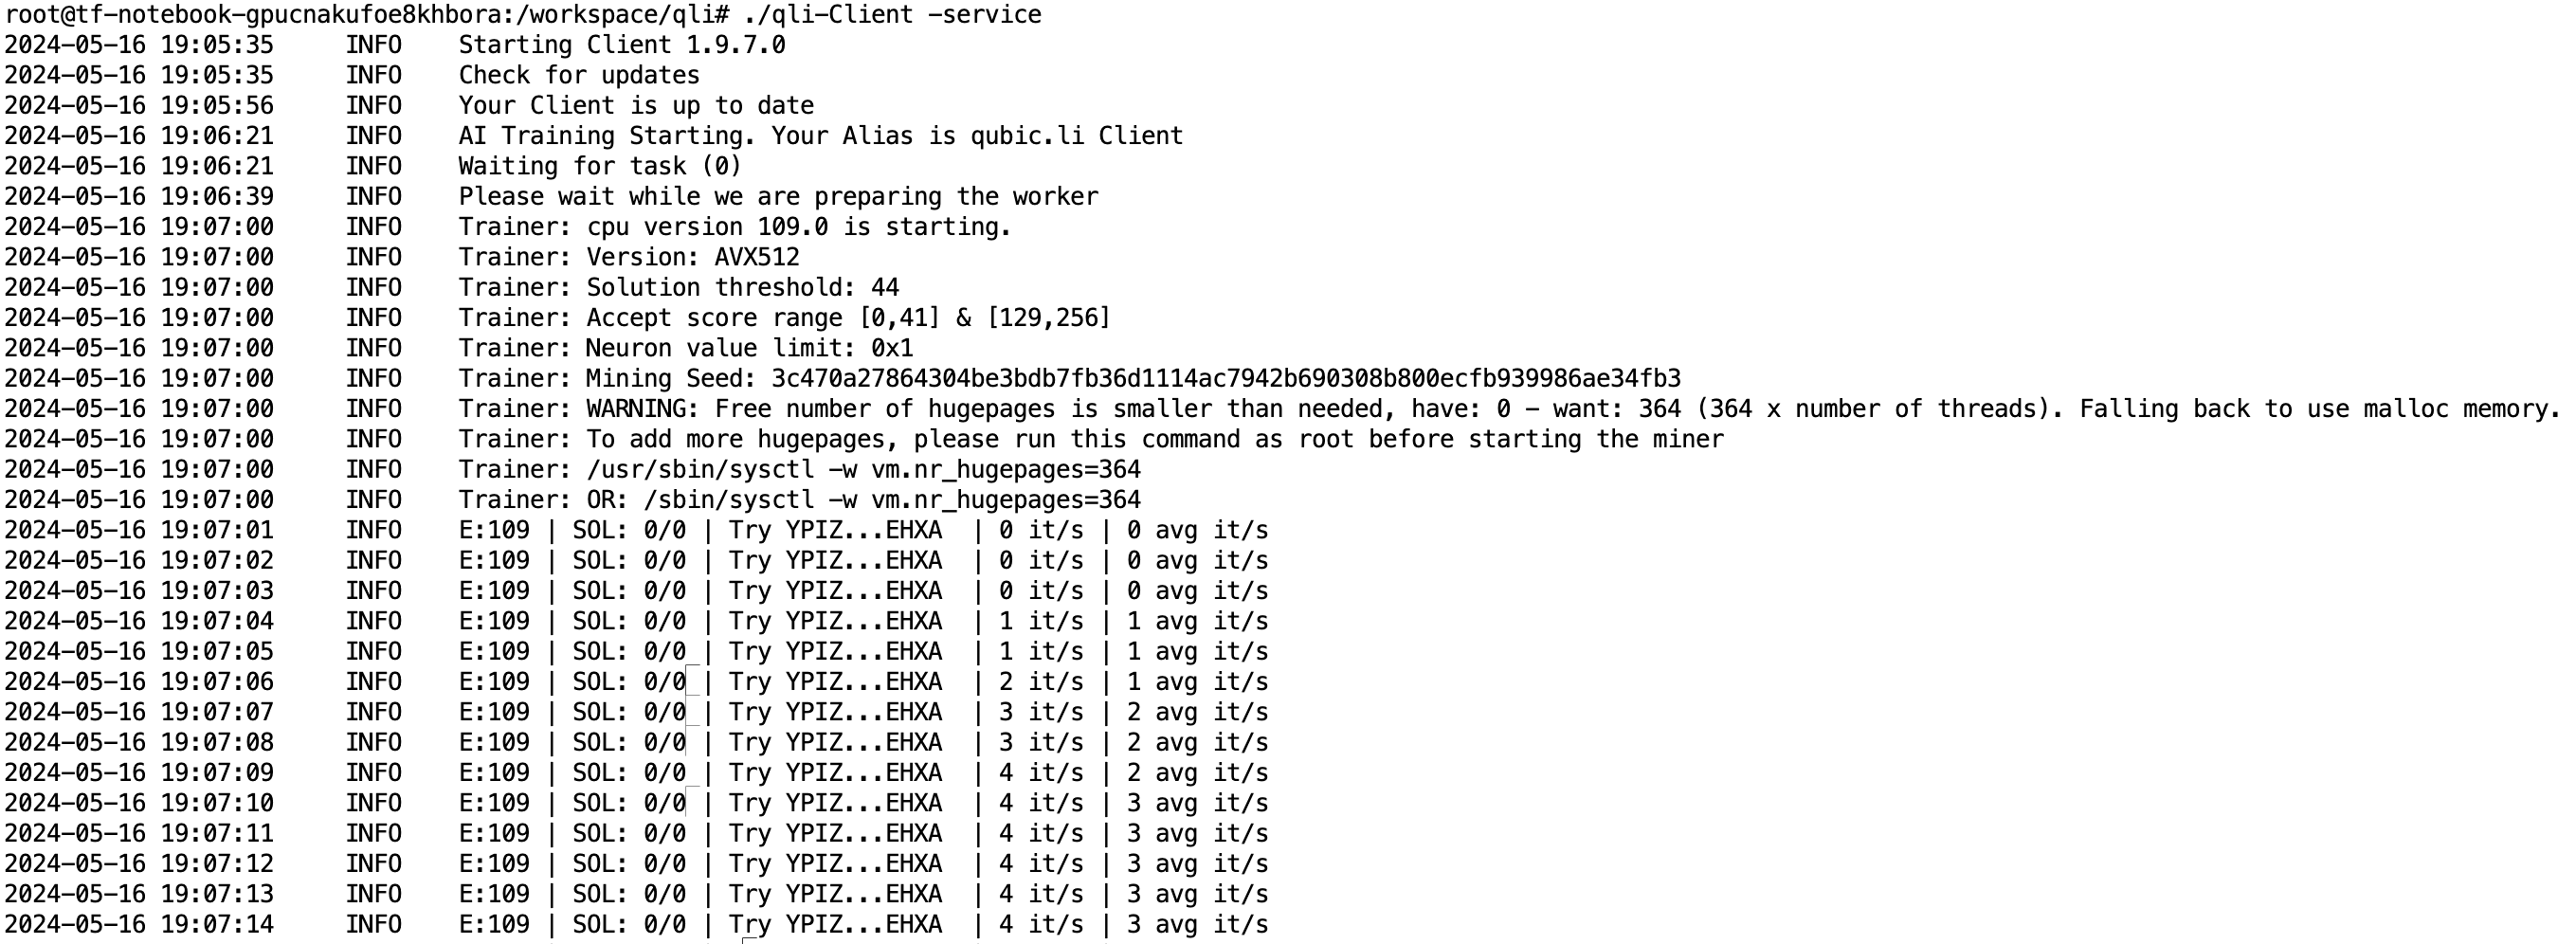
vi/vimto open it. The content is/q/qli-Client -service, which is the method to run the qli-Client command. Since the/qfolder does not exist, modify the command toqli-Client -service. - Run the mining software. If the extracted qli-Client is not directly executable, change its mode to 777 with
chmod 777 qli-Client. Then, run the software withqli-Client -service. The output should be as follows. Wait a while to see the hash power output.
- Optimize hash power. To optimize hash power, set large page memory using
usr/sbin/sysctl -w vm.nr_hugepages=364.
Conclusion
Congratulations! We have introduced how to set up Qubic mining on a GPU. You have begun your journey of exploring the new AI blockchain with Qubic. In upcoming projects, you will learn more about deploying PoW mining software on GPUs and exploring the limitless possibilities of AI combined with PoW.
Qubic是最近很火的一个PoW币种。但是如果继续用CPU进行挖矿的话,每天的收益会惨不忍睹。所以现在很多矿工都转移到了GPU挖矿。如何在显卡上对Qubic进行挖矿。读完本教程,相信你会有一个很好的起点。
Qubic 简介
Qubic是第一个使用有用工作量证明 L1 区块链(uPoW: useful Proof-of-Work)。uPoW 并不使用算力进行验证,而是使用 报价-签章-投票的机制来持续运作,而每一个矿工都可以根据其贡献的效能获得代币奖励。因此网络可以将节省下来的算力投入AI神经网络的训练。整个Layer1采用的Quorum协议结合预言机和智能合约,让智能合约能即时和真是数据结合用户因此可以在链上快速免费地进行价值交易。
Qubic是在2022年由币圈著名OG Sergey Ivancheglo 重新启动的。Qubic这个项目最早是2014年见于bitcointalk,但是没有做起来就荒废了。后来由大佬 Sergey Ivancheglo 重启,加新算法,才有了今天的样子。Sergey Ivancheglo,或者是Come-From-Beyond(CBF, Medium Account: https://medium.com/@comefrombeyond),对币圈老人是不陌生的。他是IOTA初期的四位共同创办人之一,后来由于和IOTA Foundation Board意见不合,探索了其他项目,Qubic就是他的其中一个探索。
Qubic CPU 挖矿综述
目前 Qubic 网络由 676 台Computor(计算节点)作为验证端组成。这些具有顶级硬件设备的电脑专门用来运行Qubic协议,以实现该区块链的最佳效能。在过去几个Epoch里面,一般的电脑配置是
| 项目 | 要求 |
|---|---|
| CPU | 至少8核,并且支持AVX2的高频CPU |
| 内存 | 至少128G |
| 网速 | 至少1GB/s |
可以看出来运行这个协议需要的电脑配置还是比较高的。但是即使是这样的配置,在99 epoch(2024年3月24号那一周)之后每天的收益会惨不忍睹,有时候一个epoch都挖不出一个solution来。现在一个主流的做法是从CPU挖矿迁移到GPU挖矿,因为GPU的每分钟哈希碰撞次数高于CPU一个数量级。用CPU挖矿的教程已经很多了,我们这里介绍如何设置GPU来进行挖矿。
Qubic GPU 挖矿机子选择
用CPU挖矿的话回本周期一般在两年左右,因为CPU的售价比较低以及功耗相对GPU小。一般而言,顶级CPU像 AMD Ryzen 9,售价大致在500美金左右,功耗在100W上下。但是高级一点的GPU像4090,售价大致在1500美金左右,功耗在300W上下。虽然GPU的售价和功耗大致是CPU的三倍左右,但是挖矿哈希率差不多从20kH/s提升到100MH/s,整整提升了500倍。但是由于由于功耗的提升,导致GPU挖矿的用电量会比CPU挖矿大得多。所以统计而言,GPU挖矿的回本周期可以缩短到CPU挖矿回本周期的一半。
对于家里就有GPU的朋友可以直接跳到下一节进行机子的配置。对于没有GPU的老铁们,我们就需要租GPU。由于Qubic挖矿对网速的要求也很高,所以价格和网速是我们租GPU挖Qubic的首要考虑因素。AWS,Google Cloud,和Azure的机子稳定性强,但是价格也偏贵。并且由于他们和英伟达签署的协议,这些数据中心没有消费级显卡比如4090。可以选择的对象是Vast.ai, runpod.io, io.net 和 loopin.network。以4090为例,我们用表格列出这四个选择的优劣:
老铁们可以根据自己的喜好从这些GPU提供商里选择自己的机子。我个人用了loopin.network的机子,总体来说还是符合我的预期的。购买loopin.network机子的方法在他们网站上可以找到详细的方法(比方说 https://docs.loopin.network/zh/tutorials/LLM/llama3),这里就不赘述了。
Qubic GPU 挖矿机子设置
买到机子之后,一般GPU provider给的是一个docker。进入自己的loopin.network的账号下的Wallet选项,可以看到 Rented Servers下的Server区域,通过你的远程服务器访问Jupyter Notebook。通常,实例启动需要2-4分钟。拿到实例之后用nvidia-smi验证自己买到的机子是不是理想中的。我这里买了一台RTX 4090的机子,所以终端显示如下:
可以看到这个机子是RTX 4090,它的功耗是450W,GPU是干净的,使用率为0。CUDA版本和GPU驱动都是比较新的。这比自己折腾操作系统和驱动省心多了。
挖矿软件安装
- 为了让我们的目录干净整齐,我们新建一个新的目录
qli/: mkdir qli。用ls命令就能看到在根目录下我们有一个新的文件夹qli。 - 获得相对应的挖矿软件。挖矿软件的目录在https://github.com/qubic-li/client 可以找到。我们的系统是ubuntu,所以选择Linux x64,也就是第三个。用以下命令进入qli文件夹:
cd qli,然后用wget命令获取挖矿软件:wget https://dl.qubic.li/downloads/qli-Client-1.9.7-Linux-x64.tar.gz。如果买到的机子位于中国,可能下载网速比较低,这时候可以用Jupyter Notebook的上传功能上传到指定的文件夹里(见下图)。 - 解压软件。由于拿到的是一个tar.gz包,所以tar解压命令需要带一些设置。这里使用命令:
tar -xvf qli-Client-1.9.7-Linux-x64.tar.gz。解压完之后就可以看到软件了。用ll -ath命令查看解压的文件夹下的内容如下。这里的appsettings.json 就是挖矿设置文件。qli-Service.sh 是运行脚本文件。这两个文件都是文本文件,就是可以用编辑器打开的。但是qli-Client文件是编译的二进制文件,无法用编辑器打开。 - 安装文本编辑器。设置挖矿软件和运行脚本需要用到
vi或者vim命令。一般来讲我们的GPU并没有安装这个命令,所以我们要先安装vi/vim编辑器。先用apt update命令更新我们的缓存,然后用apt install vim安装vim。安装的开始会问你是否下载,选Y(见下图)回车然后就开始安装了。安装的过程一般需要几秒钟。 - 编辑挖矿软件设置文件
appsetting.json。使用vi appsettings.json就能打开这个文件进行编辑。这里payoutId就是填写你的地址,accessToken是你注册qubic时候拿到的一个令牌。 - 查看
qli-Service.sh文件。依然用vi/vim打开,可以看到他的内容是/q/qli-Client -service,这是qli-Client这个命令运行的方法。由于我们这里没有/q这个文件夹,我们的命令应该是qli-Client -service - 运行挖矿软件 。在某些情况下解压出来的
qli-Client并不是直接就是一个可执行的文件。我们需要更改它的态。直接给最高权限777,我们有:chmod 777 qli-Client。然后就可以运行软件了:qli-Client -service。输出如下。等待一会就能看到我们的算力输出了。 - 算力优化。大部分时候,我们需要设置大页面内存,来优化我们的算力。在终端使用命令
usr/sbin/sysctl -w vm.nr_hugepages=364便可以达到目的。
总结
恭喜你!我们已经介绍了如何在GPU上完成Qubic挖矿的部署。你已经开始了使用Qublic探索新的人工智能区块链的旅程。在接下来的项目中,你讲学习更多如何在GPU上部署PoW挖矿软件的知识,探索AI 加 PoW的无限可能性。
Web3
Qubic
Qubic, a Layer 1 blockchain, uses Useful Proof-of-Work for AI training, featuring swift transactions, sub-second finality, and OS independence.
In a nutshell
In this section, we present key facts about Qubic projects, providing a concise summary of the network participants and components. Additionally, we discuss the process for minting the token.
Some facts
| Executive Summary | Earn QUBIC by using your idle machine for AI training |
|---|---|
| Website | https://docs.qubic.world/ |
| Whitepaper Publication Date | N/A (will publish when the project finished) |
| Whitepaper | N/A |
| Launch Date | 08/01/2023 |
| Current Chain Status | Qubic Network |
| Repository | https://github.com/qubic/ |
| Token Details | https://coinmarketcap.com/currencies/qubic/ |
Short Summary
Qubic is the first Layer 1 blockchain to utilize Useful Proof-of-Work (uPoW). Unlike traditional Proof-of-Work, which uses computing power for verification, uPoW operates through a quote-signature-vote mechanism, rewarding miners based on their contribution efficiency. This approach allows the network to allocate saved computing power to AI neural network training. The entire Layer 1 employs the Quorum protocol, integrating oracles and smart contracts to enable real-time data and user transactions on-chain quickly and freely.
The Qubic project was initially launched on Bitcointalk in 2014 but was later abandoned. It was relaunched in 2022 by the renowned crypto OG Sergey Ivancheglo. Sergey Ivancheglo, also known as Come-From-Beyond (CBF), is one of the four co-founders of IOTA. Following disagreements with the IOTA Foundation Board, he explored other projects, including Qubic. You can find his Medium account here.
What Role Can I Play in the System
There are three types of participants in the Qubic network:
- Computors: At its core, Qubic is powered by 676 Computors responsible for executing smart contracts. Each epoch generates 1 trillion Qubic Units (QUs) to be distributed primarily among Computors. Inefficient Computors and Miners have a portion of their rewards burned, while the remainder goes to the Arbitrator.
- Arbitrator: An entity within the Qubic ecosystem responsible for resolving disputes and protecting user interests. The Arbitrator sets the parameters of the mining algorithm, publishes lists of Computors every epoch, is developing the capacity to replace faulty Computors, and accumulates QUs not received by underperforming Computors.
- Candidates: Candidates contribute to AI training without receiving compensation. A weekly ranking, or “epoch,” determines the top 451 performing Computors, who maintain their status while the remaining spots are filled from the pool of Candidates and lower-ranking Computors.
You can participate in the Qubic network either as a Candidate or a Computor for now. The entity controlling the current Arbitrator remains unknown, though rumors suggest it’s operated by the development team.
You can contribute your computing resources to the network for AI training tasks and receive (as Computors) or not receive (as Candidates) the rewards in the epoch.
How to Mint Tokens
Mining on the Qubic network involves using computing power to process and validate transactions, including both AI tasks and asset exchanges between peers. Computor Miners are compensated with QUBIC for their contributions, while Candidate Miners are not compensated.
Tech Innovations
- Useful Proof-of-Work: Unlike traditional Proof-of-Work mechanisms that solely secure the network, Qubic’s Useful PoW not only helps determine the ranking of Computors for each epoch but also contributes to AI training. This dual-purpose approach optimizes computational resources, ensuring no energy is wasted.
- Operating System Independence: Qubic’s design allows it to operate directly on bare metal without needing an operating system. This contributes to efficient use of the hardware, heightened security, and speedy execution of tasks.
- Sub-Second Finality: Qubic offers real sub-second finality, meaning the confirmation of transactions and the execution of smart contracts is practically instantaneous. Unlike many other platforms that can take several seconds or even minutes to achieve finality, Qubic’s efficiency and speed are unparalleled.
Funding
Qubic is bootstrapped and receives support from the community.